こんにちは。エクセルソフトの田淵です。
2015/6/26 追記:
Xamarin.iOS ネイティブでの設定方法は こちら
Xamarin.Android ネイティブでの設定方法は こちら
Xamarin.Forms での設定方法は こちら
をご参照ください。
本エントリーは Android Tips: Hello Material Design v7 AppCompat | Xamarin Blog を元に書いています。詳細は元の Xamarin Blog をご参照ください。
Android 5.0 Lollipop は Material Design で Android の UI をがっつり変更しました。Android Support v7 AppCompat library が出るまでは Material Design は Android 5.0 以上のみでしたが、API 7 などの古いバージョンにも ActionBar をリプレースする ToolBar を使用することができます。
はじめに
AppCompat をプロジェクトに追加するには、以下のどちらかから入手してください。
インストールしたら、Minimum Target を API 10 (Android 2.3) とかにできます。

Material Theme の使用
AppCompat のライブラリを使用する場合、あなたのアプリの埋め込みリソースとは多くの違いがあります。まず以下の 3つからベースのテーマを選択します。
- Dark: Theme.AppCompat
- Light: Theme.AppCompat.Light
- Light with Dark ActionBar: Theme.AppCompat.Light.DarkActionBar
これらのテーマのいずれかを使用するには、Resources フォルダに values と values-v21 の 2フォルダを作成し、styles.xml を作成します。
values/styles.xml ではアプリケーションのベースとなるテーマを作成し、カスタム属性として設定できます。
values/styles.xml
<resources>
  <style name="MyTheme" parent="MyTheme.Base">
  </style>
  <!-- どの API でも適用されるベーステーマ -->
  <style name="MyTheme.Base" parent="Theme.AppCompat.Light.DarkActionBar">
    <item name="android:windowNoTitle">true</item>
    <!-- toolba を使用するので ActionBar は表示しません -->
    <item name="windowActionBar">false</item>
    <!-- 以下を参考にテーマカラーを設定します -->
    <!-- http://www.google.com/design/spec/style/color.html#color-color-palette -->
    <!-- colorPrimaryはデフォルトのアクションバーの背景に使用されます -->
    <item name="colorPrimary">#2196F3</item>
    <!-- colorPrimaryDark は status bar の色です -->
    <item name="colorPrimaryDark">#1976D2</item>
    <!-- colorAccent は widget の色合いに使われる colorControlActivated の標準色です -->
    <item name="colorAccent">#FF4081</item>
     <!-- この他に colorControlNormal、colorControlActivated、
          colorControlHighlight、colorSwitchThumbNormal などを設定できます -->
  </style>
</resources>
次の values-v21/styles.xml に Lollipop デバイス用に追加のカスタム属性を追加できます。
<resources>
  <!--
        API 21 以上用のベースのアプリケーションテーマです。このテーマは
        API 21 以上のデバイスで resources/values/styles.xml の設定を置き換えます。
    -->
  <style name="MyTheme" parent="MyTheme.Base">
    <item name="android:windowContentTransitions">true</item>
    <item name="android:windowAllowEnterTransitionOverlap">true</item>
    <item name="android:windowAllowReturnTransitionOverlap">true</item>
    <item name="android:windowSharedElementEnterTransition">@android:transition/move</item>
    <item name="android:windowSharedElementExitTransition">@android:transition/move</item>
  </style>
</resources>
最後に Properties フォルダ以下の AndroidManifest.xml を開き、Application のノードに android:theme="@style/MyTheme" を追加します。
Toolbar の実装
以前 Android Tips: Hello Toolbar, Goodbye Action Bar | Xamarin Blog で紹介したのと基本的には変わりませんが、Toolbar ウィジェットを Support Library から直接参照できます。layout/toolbar.axml を作成し、以下のように記入します。
<?xml version="1.0" encoding="utf-8"?>
<android.support.v7.widget.Toolbar xmlns:android="http://schemas.android.com/apk/res/android"
    xmlns:local="http://schemas.android.com/apk/res-auto"
    android:id="@+id/toolbar"
    android:layout_width="match_parent"
    android:layout_height="wrap_content"
    android:minHeight="?attr/actionBarSize"
    android:background="?attr/colorPrimary"
    local:theme="@style/ThemeOverlay.AppCompat.Dark.ActionBar"
    local:popupTheme="@style/ThemeOverlay.AppCompat.Light" />
Toolbar を追加するには、Main.axml の include ノードで toolbar を参照します。
<?xml version="1.0" encoding="utf-8"?>
<RelativeLayout xmlns:android="http://schemas.android.com/apk/res/android"
    xmlns:local="http://schemas.android.com/apk/res-auto"
    android:layout_width="fill_parent"
    android:layout_height="fill_parent">
    <include
        android:id="@+id/toolbar"
        layout="@layout/toolbar" />
    <LinearLayout
        android:orientation="vertical"
        android:layout_width="fill_parent"
        android:layout_height="fill_parent"
        android:id="@+id/main_content"
        android:layout_below="@id/toolbar">
        <Button
            android:id="@+id/MyButton"
            android:layout_width="fill_parent"
            android:layout_height="wrap_content"
            android:text="@string/Hello" />
    </LinearLayout>
</RelativeLayout>
Activity アップデート
Activity で AppCompat を使用するには Activity の継承を変更する必要があります。また、using Android.Support.V7.App; も追加しておきます。
public class MainActivity : Activity
から
public class MainActivity : ActionBarActivity
です。
これで新しい Toolbar で SupportActionBar を設定できました。正しい Toolbar が常に参照されていることを確認するためにエイリアスを使用することをお勧めします。
using Toolbar = Android.Support.V7.Widget.Toolbar;
その後、OnCreate メソッドで Toolbar を見つけて設定して使用します。
protected override void OnCreate (Bundle bundle)
{
  base.OnCreate (bundle);
  // Set our view from the "main" layout resource
  SetContentView (Resource.Layout.main);
  var toolbar = FindViewById<Toolbar> (Resource.Id.toolbar);
  // Toolbar は、デフォルトの ActionBar になります
  SetSupportActionBar (toolbar);
  SupportActionBar.Title = "Hello from Appcompat Toolbar";
  //..
}
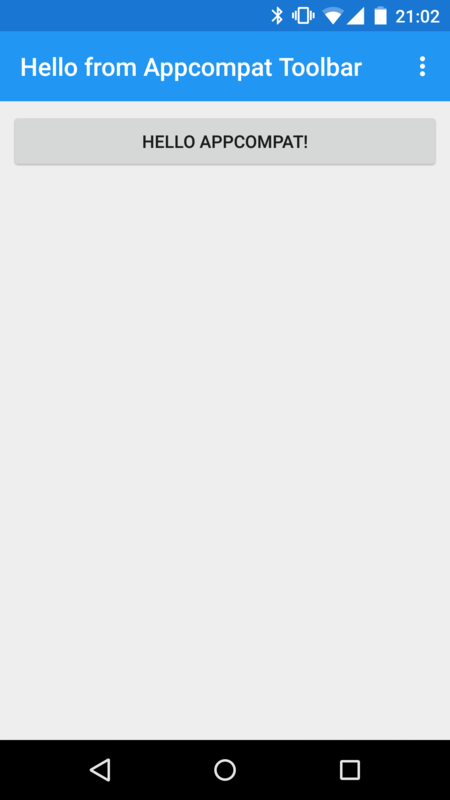
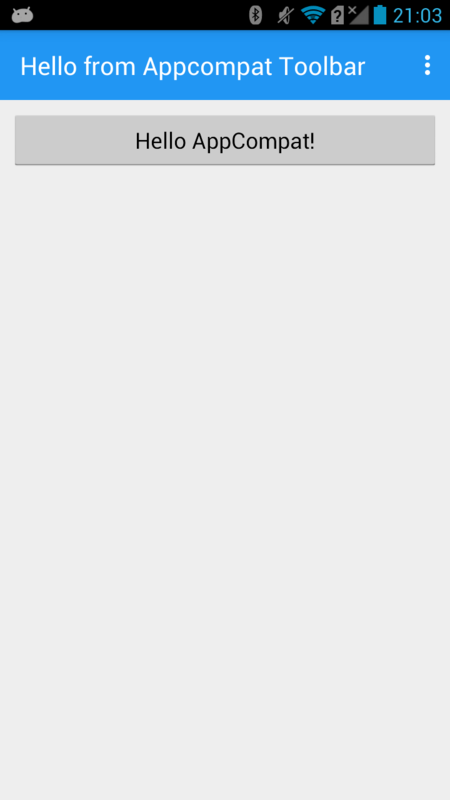
これで、古い Android でも Material Design のアプリを実行できますね。

Nexus 5 です。

GL07S (Android 4.1.2) です。
ここまでのソースコードを Android/MeterialAppCompatSample に置いておきました。
また、参考までに Visual Studio 用のプロジェクトテンプレートを置いておきました。
また、大本の James Montemagno さんによるソースコードは Support v7 Toolbar - Xamarin にありますので、併せてご参照ください。
James さんのやつは画面下にも BottomToolBar として 2つの Toolbar を使用しているサンプルで参考になると思います。
Xamarin 気になった方は
是非 ダウンロード(直接) / ダウンロード(弊社経由) して触ってみてください。 学習用リソース や JXUG リンクページ に参考資料を纏めてますので併せてどうぞ。
以上です。


